Version française


? | Home page | Tutorial | Advice and notes

Homepage
Home page


ADVICE AND NOTES


In order to help you while you are mixing, you may find it useful to place a reference song on a dedicated track of your DAW. If you're making a song that sounds like the band Cytrobal (don't bother, I made it up...), pick one of their songs and listen to it carefully. The purpose is not to just listen and enjoy, but to hear what the instruments sound like, what stands out most and when, what effects are used and how much, where the instruments are located and parted, etc.

Then try to draw your inspiration from it to give your piece the same color, the same tone. Listen to the reference song then your own to compare them as your mix is progressing to check that you are on the right track. This is not easy to do, it takes experience, habit, and it also takes knowing your equipment as yours is different from theirs and you can hardly reproduce the exact same sound. But it will help and inspire you. This is just a piece of advice, but you can learn a lot from doing this.
Top of page
Do not neglect the recording quality by thinking you can put things right or conceal your mistakes when mixing. The best the recording quality, the less fixing you will need to do. Not everyone is a master, and it is best to record the same thing 20 times in a row until you get the "perfect" take rather than content yourself with a mediocre take that you will try to enhance afterwards.
Top of page
What recording format should you use? An audio CD uses 44.1 KHz and 16 bits, but I strongly recommend you to record in 24 bits for more calculation accuracy and thus, gain in quality even if your finalized work will use a CD format. When recording and mixing, ensure the highest possible quality but be reasonable. Even if your hardware supports it, no need to work in 192 KHz and 24 bits.

I personally use 48 KHz and 24 bits, but for obvious compatibility reasons, I would suggest 44.1 KHz and 24 bits. It is a good choice to have good quality, reasonable file size and a good level of available computing resources. Yet, I never heard any quality loss when converting my recordings to CD audio specifications. It doesn't mean there isn't any, of course.

The bigger the format, the more computation will be long and complex, with no difference in quality clearly audible.

See how stereo wav files will get bigger as the quality goes up:
    96 KHz 24 bits - 32.9 MB            96 KHz 16 bits - 21.9 MB
    88.2 KHz 24 bits - 30.2 MB            88.2 KHz 16 bits - 20.1 MB
    48 KHz 24 bits - 16.4 MB            48 KHz 16 bits - 10.9 MB
    44.1, KHz 24 bits - 15.1 MB            44.1 KHz 16 bits - 10 MB
As you can see, the difference between 16 and 24 bit files is pretty big for an identical KHz figure (66% gap), and this is directly related to the accuracy and quality of the sound file.

You may consider the CD to be a reference (44.1 KHz and 16 bits), but CDs are no longer the main music support. Many people listen to audio files that are not on a physical CD. The 44.1 KHz rule no longer applies. An MP3 file may be encoded in 48 KHz, so unless you aim at a CD format, you should not have to worry about 44.1 or 48 KHz.
Top of page
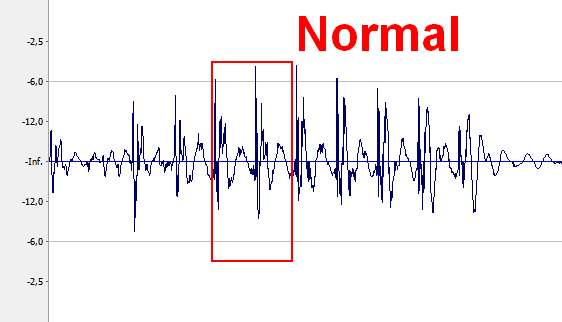
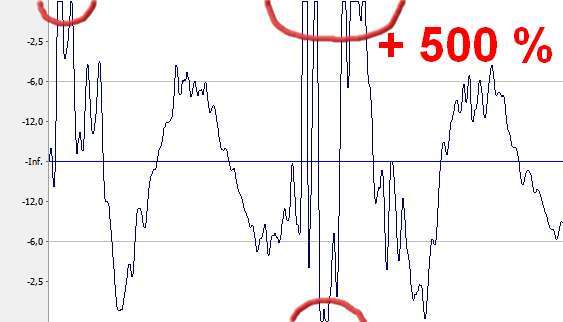
What the right recording level? ith digital recording, the level you should never, ever go above is 0 dB (zero decibels). Zero is the ceiling, anything above it should not be there, it is a forbidden zone! Why? Because when the sound goes beyond that, you get distorsion. Not the kind of distorsion you would appreciate for a guitar, though. In fact, above 0 dB, the sound just seems to crash on the ceiling. See the graphics underneath, you can see the sound curve at a normal level, then the same curve with a 500% level raise. You can see that the sound peaks are crushed, distorted. This is exactly what happens when you go beyond the 0 dB level when recording. If this happens too much or too often, it will be audible and it will greatly decrease the sound quality of your work.
Normal volume curve

Clipping volume curve
To avoid this, you need to set the entry level. For the guitar, play a few notes or chords and do strongly. Set your recording level in such a way that even your strongest strokes do not go above -6 dB on the D.A.W.'s track VU meter. For vocals, sing in the microphone at the maximum volume you will be producing during the actual song. Check that the vocal track VU meter does not go beyond -6 dB either. And proceed the same way for all the instruments you need to record. If you do it correctly, there is no reason why you should go beyond the ceiling when the actual recording begins.

And there is no need to become paranoid. During the recording, if you see that the VU meter hits the red zone, but you only go beyond 0 dB once or twice very briefly, that should not be a problem. It probably won't be audible and furthermore, you will be able to correct it manually. But if you see that your recording level is constantly hitting the ceiling, then stop recording, lower the entry level and start over. Either you forgot to set the entry level, or you played or sang much louder than when you were ajusting your settings. One thing is certain: if you set your vocal levels by whispering in the microphone, then record screaming, you will get some bad surprises!
Top of page
Here is an efficient method to detect flaws:
Once you (think you) have finished mixing, listen to your song for your own satisfaction, then do something else. Forget about your song, go walk the dog, read a book, go see friends... Wait a day or two without listening to the song at all. And then, comme back to it: you will rediscover it, with fresh ears, and the song quality and flaws will jump right to your eardrums!
Immediately take notes of everything that bothered you: guitar 1 is too loud, or the voice is too bright, or the bass drum is too boomy, or this, and that... Write down everything you think is wrong and sounded obvious, then fix your mix. And then again, wait for some time, listen again and do so until everything finally meets your taste.
This process can be rather time-consuming, but it is indeed pretty efficient.
Top of page
If, in spite of all your efforts, your mix does not not meet your expectations, do not hesitate to start from scratch.
Keep the raw recording, delete all of your settings, plugins, effects and start over. You could even start recording again if you think that this is the cause of the problem. But let's assume it is just a question of settings... By starting all over again, chances are you will not reproduce the same things you previously did, so your new settings may well satisfy you more.
Errr... Just in case, keep track of your first mix (by recording your new mix under a different file name). You never know. If you cannot do better thant the first time, you will be glad to have kept your original settings!
Top of page
Mixing is not exactly hard science and the results you get may please some people and displease others. One person can find a mix pleasant one day and see flaws in it the next day, depending on their mood. It is all a matter of compromise, but you are the main judge. After all, you are the song creator, only you know if the end result is satisfying or not and meets your expectations.
Top of page
Know your equipment. If you need to do some specific task, you will gain time by reading the manual, rather than click everywhere at random and hoping to find the function you are looking for. The more the software is complex, the more functions there will be and you may spend a considerable amount of time looking for things you might not even know what they are called. Learning is a long process, but it is rewarding.
Top of page

QUESTIONS

Why isn't it recommended to mix with headphones?
It's not recommended, but nothing prevents it.
First, headphones all have different specifications. Some will accurately render low notes, while some will be better at high frequencies, etc. As for monitors, it is difficult to find perfectly neutral headphones, and the proximity of the sound to your ears will also be different from what should be considered "normal". In every day life, you don't hear sounds through headphones. Sounds fly through the air before reaching your eardrums. This normal perception is modified by headphones.
Another important side effect: stereo. With speaker monitors, your right ear will hear what's coming from the left speaker and vice versa. With headphones, this is not the case. What's on the far left remains left and the right ear won't hear it at all. When mixing with headphones, you may want to compensate for it by adding some of the left sound to the right for example, but you would not have done that when mixing with monitors. It doesn't mean it's wrong, it just means that you might take different mixing decisions if you mix with headphones.
The best solution is to be able to listen to your mix on several sound systems (and several types of headphones) in order to maintain some neutrality.

Why create several buses from one instrument track?
The settings of instrument buses are all different. Their pannings are different. For example, one bus of guitar 1 is set to 30% left, another is set to 65% left and the reverb is set to 100% left. So with only one guitar track, you will create 3 different sounds and these sounds will span on all the left side and fill the space.
Another advantage is that you can finely tune each setting by changing the panning, the volume and even the EQ of each bus, so the instrument will produce the sound you're looking for.
You could also records several guitar tracks playing the same thing and set their panning individually. This means you will have to record more tracks, which is also a good solution.

Why is the volume of the instruments' main buses so low (-23 dB for example with the "Guitars" bus)?
All main buses (drums, bass, guitars, vocals, keyboards) are routed to the Master bus. You must never go above 0 dB, but the volumes will add up and when you add up the volume of all main buses, you have to take care that their addition doesn't fo above 0 dB. In the case of the tutorial song, Life, with the settings I did, the Master bus has sound peaks around -5.5 dB... when the Master plugins are deactivated of course. Once the mastering plugin is activated, the peaks go up to -3.5 dB. This leaves enough margin (to my taste) to activate the final limiter plugin and boost the sound up to -0.2 dB.
The thing is you should set your main buses in a conherent manner, so that their relative volumes meet your expectations. Only then, you can fine tune these bus volumes in order to get the desired level on the Master bus (around -4 dB in my case). To achieve that, you will have to move all the main bus volumes in the same way. For example, when all your relative ajustments are done, and if you obtain a sound peak of +3.8 dB on the Master bus, you will have to reduce all main buses by about 8 dB in order to make sound peaks no greater than -4 dB.
Consequently, this means you must NEVER touch the Master bus volume. It should remain at 0 all the time. If your peaks go over 0 dB on the Master bus, lower the volumes of all the buses that are routed towards the Master bus by the same amount to compensate for it.

What's a "db", by the way?
It's the abbreviation of "décibel", a sound volume unit. Unlike length or weight units, decibel is logarithmic. In length, 100 meters is twice as long 50 meters. In acoustics, 100 db is not twice as loud as 50 dB, it's 130 000 times more! The energy coming from a sound doubles every 3 db. In other words, 53 dB is twice 50 dB, 56 dB is twice 53dB and 4 times as big as 50 dB, etc. By the time you reach 100 dB, you will have multiplied by 130 000!!!

But that's theory. In reality, it's hard to affirm that a night club is 130 000 times as loud as a washing machine... I read here and there that the feeling of a sound doubling was rather every 10 dB. So 100 dB would sound about 32 times as loud as 50 dB. That's of course pretty difficult to evaluate this sort of things, and the perception we have may vary depending on the people, the physical condition, the age, the tireness, etc. That's all very subjective.

Examples (from Wikipédia):
    - 0 dB : hearing threshold
    - De 0 à 10 dB : desert
    - De 10 à 20 dB : professional recording booth
    - De 20 à 30 dB : low voice conversation, whispering
    - De 30 à 40 dB : forest
    - De 40 à 50 dB : library, dishwasher
    - De 50 à 60 dB : washing machine
    - De 60 à 70 dB : clothes dryer, telephone ringing, television, normal conversation
    - De 70 à 80 dB : vacuum cleaner, noisy restaurant, train driving at 80 km/h
    - De 80 à 90 dB : lawnmower, car horn
    - De 90 à 100 dB : high-traffic road, chainsaw, forging workshop, high-speed train at 300 km/h at a distance of 25 m
    - De 100 à 110 dB : pneumatic drill less than 5 meters away in the street, night club
    - De 110 à 120 dB : thunder, boilermaking factory
    - De 120 à 130 dB : firetruck siren, plane taking off (300 meters away), amplified live concert
    - 130 dB : pain threshold
    - De 140 à 150 dB : formula 1 race, plane taking off
    - 170 dB : shotgun
    - 180 dB : space rocket taking off, missile launching
    - 194 dB : loudest possible sound in the air pressure at sea-level. Any wave above this is no longer called a sound wave but a shock wave.

Is the MP3 (or any other compressed file format) evil?
No. MP3 is a "destructive" format, which means it damages the non-compressed audio file by eliminating information that are considered inaudible and useless, in order to reduce the file size. But compression can be changed. When you want to make an MP3 out of a WAV uncompressed file, you can choose the level of compression you want. In the end, with the same WAV file, two compressed audio files may have completeley different audio qualities. The more you compress, the smaller the file will be, but its sound quality will be lower.

To maintain an optimal quality with MP3, choose a 320 kbps (kilobits per second) compression with constant rate, rather than 128 kbps which give you smaller file but at the cost of audible sound degradation.

In fact, the flaws of a compressed audio file such as MP3 are not always easy to detect (unless the compression is extreme):
    - People with good ears, purists, sound lovers are much more sensitive to these flaws.
    - The sound system quality will allow you to hear more or less compression problems. With bad earphones, or if you listen to music with your laptop computer speakers, flaws will not be perceptible, because these sound systems are low quality.

And you have to know that few people will actually be able to hear a difference between a high-quality MP3 and a WAV file, especially if you don't have a high-end sound system. Many people who insist that they hate MP3s because they "deteriorate the sound" are in fact unable to make the difference in a blind test. But beware! Some are indeed able to hear the small differences there are. But to say that MP3s are evil is nonsense. Of course, if the compression is very strong, the sound will be damaged, but high-quality MP3s still allow for small-sized files (compared to WAV files) and still retain a more than acceptable sound quality.

Would YOU be able to differentiate these sound samples without knowing which is which?
WAV sample: 48 KHz 16 bits - 2,34 MB
MP3 sample: 32 kbps - 50,3 KB
MP3 sample: 64 kbps - 100 KB
MP3 sample: 128 kbps - 201 KB
MP3 sample: 192 kbps - 301 KB
MP3 sample: 320 kbps - 502 KB
32 and 64 kbps MP3 samples are very easy to spot because the sound is so bad. 128 kbps is pretty good (with this sample at least). I cannot really hear any difference between 192 and 320 kbps samples, and I cannot really differentiate them from the original WAV file. Maybe some of you can?
Listening - Previous
Top of page


MESSAGES

(Leave a message)